Pages

Monday, January 30, 2012

Valentines for Boys 2: Superhero Valentines

Superhero Valentines: It's all that sweet stuff in disguise, so even the littlest guys will like it!

In the second edition of Valentines for Boys, it's nephew #2's turn. See Valentines for Boys: Part 1 for more ideas. Nephew #2 was just as excited to pick out his own design and quickly selected the Superhero Valentines.


Supplies: 30 tootsie pops (I used the Valentine's Day themed), cardstock in a variety of colors, tape or glue dots, glue stick, scissors, hole punch

I created a black and white template printable, you can download it here. Print the template on any colored cardstock you desire. 

To make the superhero emblem on the cape, out came the trusty Silhouette. I found a Superhero design in their store and used the LD Blankie font. The Superhero design was two pieces, so I decided to only use the inner piece. For instructions on how to print and cut, check out the tutorial on the Silhouette FAQ page.

It would also be easy to make these with a printer and cardstock and then cut a design by hand.

To assemble: Cut the shapes from the template by hand. Then punch a hole in the top of the capes with the hole punch. Attach your superhero emblem using the glue stick. The cape slides on to the stick of the tootsie pop and shouldn't need anything to secure it - the wrapper helps it stay in place. Then attach the mask with a glue dot or piece of tape.

Perfect for any little boy!


Pin It

Sunday, January 29, 2012

Valentines for Boys: You're the Bomb

There are so many cute things for kids around Valentine's Day. Seeing all the cute things everywhere was giving me the itch to get crafty but I have no kids of my own. So the other day, I had a bright idea - why not make fun stuff for other kids! First on the list, my adorable nephews.

I sent my sis-in-law a bunch of great ideas for things I could make for the boys to take to school for Valentine's Day. The boys were so excited and quickly picked out their favorites.

These are for nephew #1 and are inspired the Valentine Doings post at Make it Do.


1. Supplies needed: 30 individual size Kit-kat bars or other small candy, 30 - 2" by 2" squares of red scrapbook paper, 30 pieces of 12" black pipe cleaner, scrapbook adhesive or tape, 2 sheets of 12x12 red scrapbook paper for the tags.

2. As shown in the picture, place a strip of adhesive down the edge of the square of paper. Place another strip on the opposite edge, on the same side of the paper. Line up one edge of the candy bar on the paper and press down firmly.

3. Roll the paper around the whole way until it sticks on the opposite side. The candy bar should be completely covered. If you are using tape, just roll the paper around the candy and tape the ends closed.

4. Cut your pieces of pipe cleaner into 2 lengths. Four inches long for the fuse and 8 inches long for wrapping around the stack of candy. You should end up with 30 pieces in each pile.


To begin assembling, stack 3 wrapped pieces of candy together in your hand. Put one piece of "fuse" pipe cleaner in the middle of the stack. Then take your long piece of pipe cleaner and wrap securely around the outside of the bundle.

It should look like this when you have them to this point.

To make the tags, I got out my Silhouette. I found a great circle tag from the Silhouette store and loved the way the LD Petticoat Twist font looked for these. I used the print and cut instructions found on the Silhouette FAQ page.

To do this without the Silhouette, you can type up tags in Word and cut them out using a circle template and hole punch.


Finishing touches: I hung the tags on the pieces of pipe cleaner that were hanging out and then tucked the excess behind to help hold them in place.

Now all he has to do is sign his name and try not to eat them before Valentine's Day gets here!

Take a second to vote for these on Craftsy by giving them a heart. Thanks for your support!

Pin It

Thursday, January 26, 2012

Random Musings: Lost Phone

I swear at least 5 times a day I utter the phrase, "I can't find my phone!" I can hear my mother now saying, "It's not nice to swear." But it's true. The phone plays some sort of crazy disappearing act on me all throughout the day.

The other day, I was wandering everywhere in the house looking for it and about to give up. When I get to this point, I usually have two routes to take. If I am home alone, the house phone usually comes to my rescue. I'm pretty sure it's the only reason we have a house phone anymore. If someone else is home, they are the lucky one who gets to call my phone in search of it.

Unfortunately, this doesn't always workout the way I would like it to. My phone has this great little switch, which makes it so easy to turn the volume off and turn vibrate mode on. Problem is that I almost always forget to turn the volume back on. Doesn't work out so well when trying to call my phone to find it!

My husband keeps telling me that he's going to get me a leash for my phone. Something like this might do:

Source: amazon.com via Andi on Pinterest


Although, I can't imagine carrying that around all day! Can you just imagine the looks I would get if I answered a call on that phone while out running errands?

Lucky for me this time, I didn't have to go through all these lengthy measures. After searching high and low for the crazy phone, I found it on the couch I had just gotten up from. I swear it wasn't there when I left. (Sorry, mother!)
Pin It

Tuesday, January 24, 2012

So Pinteresting! #1 Baby Things
Anyone that follows me on Pinterest knows that I pin baby stuff like crazy. Anyone who doesn't know me probably thinks I'm having a baby soon or planning to have one in the near future. Well I'm not, but it seems that everyone I know is!

So I have been pin crazy with ideas for great things that they need. We've been surrounded by little boys in my family for over 10 years now, so I'm very excited to have a girl coming our way soon. All I see lately are pink, ruffles and rhinestones! Girly, girly, girly! I mean it's really about time!

With all the pink on the brain, these are some of the things I've been seen pinning:


Source: etsy.com via Andi on Pinterest

Source:teagreenchandelier.com on Pinterest via user andimac14

Source: The Mama Dramalogues - Make It: Gorgeous Shadowboxes

Now to just get started making the new little one things before she gets here!
Pin It

Monday, January 23, 2012

How to Resize a One-Shoulder Top

Have you ever ordered something online and when it arrived, it just didn't fit quite right? Well that's what just happened to my sis-in-law. It can be such a pain to return things too! This new shirt is so cute but it just needed a little help to make it fit. Sewing machine to the rescue!


The problem she was having with the shirt was that it was a little too wide on the sleeveless side, so it stuck out very awkwardly. The satiny material of the shirt can be kind of hard to work with but I found a way to help with that.

To make alterations some helpful tools to have are tailors chalk (or a washable fabric marker), sewing pins, a straight edge ruler (or other ruler), pinking shears and a cutting board. Oh and don't forget the sewing machine!

I had her try the shirt on inside out and then marked with the chalk where it should be taken in. Then laid the shirt out on the cutting board and traced that point down the entire seam. It ended up being about an inch that needed to be taken in.

After marking that point, I pinned along the chalk line. I left in the original seam for now. This is to help keep the pins from slipping and sliding around too much since the shirt is satiny.

Since I don't have a serger, I used a zig-zag stitch and sewed along the chalk line making sure to backstitch at both the top and bottom. Then followed this with a straight stitch along the same line for reinforcement.

Someday I will figure out all the stitch functions on my machine and can probably do something better than this but it works for now. From the outside it looks just as pretty as the original seam.

I finished it off by removing the old seam with pinking shears. This will help prevent fraying. They are a great thing to have if you don't have a pair! The last step I always do is pressing the new seam with my iron at the correct temperature setting for the fabric I'm working with. This gives it a more professional, less homemade look.

The shirt turned out better than new because now it fits! Are you ready to try it on yours now?
Pin It

Friday, January 20, 2012

Pantry Organizing {52 Week Organized Home Challenge}

This week's challenge from Home Storage Solutions is decluttering and organizing the pantry, spices and food storage spaces. A few weeks ago, I organized my spices because they were an out of control mess! The rest of the pantry really needed some help though so I was excited to start this challenge.

Join the 52 Week Challenge with me and follow along on here as I get organized!

This is the top of my pantry. Stuff was just shoved everywhere before I started cleaning! There were random tupperware containers at the top, even though we have a tupperware cupboard. The baskets were overflowing to the point that if you tried to take them down to find something, everything fell on you or the floor.

After: The appliances are neatly arranged on the right side and easy to get to. The baskets are cleaned out and labeled. So much better!

The middle section of the pantry was probably the hardest! I realized as I was cleaning it out that we had so much stuff in there that I had no clue we even had. A lot of stale chips for one thing. I headed straight to the Dollar Tree to look for some things to help organize this mess.

After: I bought some stacking shelves for the canned goods. It seems to really help us see what we have and organize things better by category. I got out my Silhouette and labeled a lot of things. More for the sake of others. It wouldn't be good to mistake salt for sugar. The medicine area is so much neater too. Everything is in baskets and easy to get to. 


The bottom section was kind of chaotic before I tackled it. We had baking racks in the back that were a pain to get to. The mixing bowls were hidden in that weird back corner and with most of the stuff down here, we always seemed to knock something over when we tried to get something else out.

After: I stacked all the linens on the side - seemed to make more sense for them all to be together. The mixing bowls went into a different cupboard in the kitchen. I made another appliance shelf for the miscellaneous things down here including our waffle iron that was lost in the back. I reorganized all the ziplock bags and plastic wrap type stuff where they wouldn't be in the way of other things. Then I found a great place for the baking racks and our cutting boards (those were in another cupboard and impossible to get to). I also swept out the bottom and found a home for our lunch bags.

Looking at it now, I can't believe we could find anything in the mess before! It's no wonder we would open the door and decide we had nothing to eat. All we could see was peanut butter, tuna and chips. Not a great combination!


Thursday, January 19, 2012

Some Things Just Don't Turn Out as Planned...

There are some things that I've made that I absolutely love. They go exactly as planned while making them and the end result is usually better than what I had pictured in my head.

And then there are others... Boy are there others!

These are some of my mishaps from recent projects:


At first glance this skirt may look perfectly fine, but it's not at all. I actually cried when I first tried it on. The trouble is that it's much wider than it is long. The dang thing is only 14 inches long! I have no idea what went wrong in making it but something sure did. My curvy butt hangs way out of this thing! There is NO WAY I was even going to try it on to show you all how horrible of a skirt it is!

Boot socks have been all over Pinterest and I have been in love with them since I first laid eyes on them. I got a great pair of boots right before Christmas and headed straight to Goodwill to gather up a bunch of sweaters to make some myself. They couldn't be too hard right? Wrong! I had no trouble making them at all but never once thought to actually try out the sleeves and see if they would fit my legs. Big mistake! Such cute socks and I'll never be able to wear them because they don't even fit my arms. How in the world did I ever think they would fit my legs?! Lesson learned there!

My sister has been asking me to help her out with a project for her dog. He has been marking the walls, furniture and well... just about everything in her house and she's been having trouble getting him to stop. I made him a belly band but since he is a dachshund, it had trouble staying put. My next idea was to make a harness but lengthen it so that he could wear it while in the house and not mark everywhere. Good thought but didn't go according to plan.

I am not sure if it was the pattern or user error but it just didn't go well. My old stuffed dog is my lovely model (Max, the dachshund wouldn't sit still for pics). The neck strap was supposed to be the same size as the dog's neck and attached to the body piece. That made for a HUGE head hole. Then the other problem was that I more than doubled the body length and it still barely came past the chest. This was the point I got to and finally threw in the towel. Yep, gave up!


My next idea was to make my own style belly band but use fleece and a bit of elastic to help it stay. It seemed brilliant to me. I took precise measurements and sewed very carefully. Then came time to try it on. Crap! I measured around his waist and cut the fabric to that length. I didn't account for the need for extra fabric to actually wrap it around to secure it. Back to the machine for try THREE!

I know there will probably be many more days like these. The goal is trying to learn to laugh a little more about it.

30 Before 30: Update #1


It's just over six months until I turn 30! It seems to be getting here faster and faster. The other day while driving around, my mother said something to me about people my age, "You know, in their 30s." I shrieked! "I'm not in my 30s! I'm in my 20s!" It was a big "AHA!" moment. I'm about to be in my 30s. It's not that I really have a problem with that. It's just a bit weird to actually say it out loud.

So I've started checking things off the 30 Before 30 List and I've realized that I need to kick it into high gear if I want to get this stuff done.

Here are the things accomplished on the list so far:

#2. So far I have lost 20 of the 40 pounds! Yea! So excited about that.

#6. We have been trying about one new recipe a week. Some of them are listed in the Recipe Roundup.

#7. I'm getting better at making tutorials. It's a work in progress but you can check out the latest one to see how it's going.

#26. I just watched One Flew Over the Cuckoo's Nest this last week. It was a strange but good movie and not at all what I expected. Definitely need to get on to watching more!

#30. I've read two small Kindle books so far this month.

The first was How to Save Money Every Month by A.C. Jones. It's a fast read with lots of basic tips on saving around the house.

The second was The Coupon Diet by Beth Jones. This was a much faster read. It covers a lot of basic couponing tips. I already knew a lot of what was covered because I have been couponing for quite some time now but I would highly suggest it for someone who is just getting started.

It's time to get the ball rolling on this list and get things checked off!

Monday, January 16, 2012

The *Easy* Baby Blanket


My father-in-law was looking for a gift for a co-worker who had just had a baby. I wanted to make something functional and pretty but I was also short on time since I had forgotten that I had promised to make the gift. While surfing around on Pinterest (as I have been known to do), I stumbled across this delightful tutorial over at Mama Stellato.

Her pattern is just as simple as the title suggests. I was in love! Here was something that I could get done fast enough to make up for all my forgetfulness.

The front piece I used is a patterned fleece. I was able to find a cute baby themed pattern that I just loved. I found a matching piece of brown flannel for the back panel. Since the fleece is so thick and cozy, I didn't use the batting as the pattern suggested. Putting the fleece and flannel together made for a super soft and cuddly blanket. Other than that, I followed the steps outlined in the tutorial.

These are so fast to sew up that they are now part of my regular routine for my Project Linus blankets. Saves a lot of time, since I always seem to be working on a million different things.

So the next time you have procrastinated a baby gift, keep this in mind!

Tuesday, January 10, 2012

How to Clean Stove Burners

I was cleaning the kitchen the other day as I work toward my 52 Weeks of Organization. It's something I'm trying to do this year so that my house doesn't stay in a constant state of chaos. I realized that my stove was DISGUSTING! I mean capital D - Disgusting! It's no wonder that at the last place we lived, we got charged for cleaning the stove when we moved out. Unfortunately, just a simple wipe down was not going to do this time and I did not want to spend hours cleaning this mess.

This is my stove before I cleaned it. Gross, right?! I could not believe the mess when I actually got to looking at it up close.


A light bulb went off! I always use Easy Off Heavy Duty to clean my oven - it saves tons of time cleaning the burnt on gook in the oven. It was worth a shot right?! So, following the directions on my can, I put on my rubber kitchen gloves and gave the stove burners a thorough coat of the Easy Off. I took everything apart to be sure that the Easy Off would get to all the dirty parts.


The directions said to let it sit for 20 minutes.
I turned on the kitchen fan to make sure there was good ventilation from all the fumes - I didn't want to pass out on the floor or anything. After the 20 minute timer when off, I came back and surprisingly most of the grease and burnt on mess just wiped right off!!! There were a few of the really dirty spots I had to scrub a bit but it cleaned up soooo easily. I followed it up with a good rinse too.


The end result was so wonderful! My stove top looks as good as new. This is also a great thing since we rent. I know that whenever the time comes to move again, I can get the stove into tip-top shape and not ever get charged again for a silly cleaning fee. And even better than that, I don't have an embarrassingly dirty stove when company comes to visit!


Tuesday, January 3, 2012

DIY: Monogram Coasters

My brother-in-law has been wanting me to make him coasters ever since I got my Silhouette and he saw all the great things I was making with it. I was planning on making them for his birthday and then somehow it didn't get done in time. So I made sure to put them on the list for his Christmas stocking. They turned out to be such a fast and easy project, I don't know why I didn't get them done sooner!

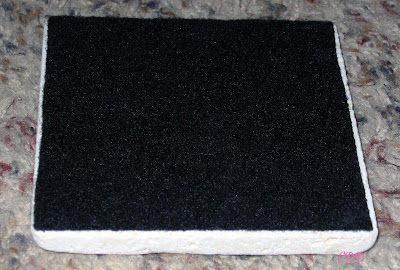
I found these great tiles at Home Depot packaged in a set of 9 for only a few bucks. They are nice unglazed tiles so they should be perfect for absorbing condensation from drinks.

I cut squares of craft felt just a tad smaller than the tiles. I used my rotary cutter and ruler to get nice even squares. (Don't you love my carpet background? I had to work on the floor because every other space in the house was covered in Christmas chaos!) The felt is a great backing so that the tiles don't scratch whatever surface the coasters are going to be used on.

I coated one side of the felt with Fabri-tac and made sure to give it a really good coat. I wanted to make sure that all of the felt was going to stick to the tile.

Then I carefully lined it up with the back of the tile and smoothed it out to make sure that there were no bumps and that the whole thing was secured. I did this to all four of the tiles that I was making.

When they were all glued, I got a big stack of books and set them all under it to dry to make sure they set up really well.

Now for the monograms! On my trusty Silhouette, I settled on the LD Old Glory font and stretched it to a good size to be centered on the tiles. I made one and then copied it so they would all be the same size. Weeding out the little holes in the "Cs" was quite a task but I got them all done. I measured and marked each tiles to be sure the were centered and then applied the vinyl. I have step by step instructions on applying vinyl on this tutorial. If you don't have a Silhouette, you can always use an X-acto knife and cut a design by hand. 

He loved them so much that he wants me to make more. Let's see if I can get them done before next Christmas!

Linked up at:  Fun to Craft 'Look At Me' Party, Sew Can Do Craftastic Monday, Hope Studios Tutorial Tuesday, My Girlish Whims