Pages

Showing posts with label pinterest. Show all posts

Monday, May 7, 2012

Package Pals Craft Exchange

Over at C.R.A.F.T., Jamie hosted another great Package Pals exchange. This time around I got paired with Ami from AliLily. She is so fun and we have become great friends. Stop by her blog because she has great recipes, craft tutorials and you will LOVE the jewelry she makes!

Participating in Package Pals is a blast because not only do you get to make something crafty for someone else, but you get the surprise of an awesome package in the mail.


After getting to know Ami, I found out her favorite color was orange so I went with a totally orange themed package.

Sunday, February 26, 2012

6 Great Organizing Ideas

While I've been working on finishing the craft room makeover, I've come across A LOT of great organizing ideas over on Pinterest. I thought that rather than keep them all to myself, I should spread the love and share some of them with you.

                             Source: orgjunkie.com
I'm an Organizing Junkie has a round-up of their favorite organizing links going on. Plus their page is one of my very favorite organizing sites!


Family Circle gives a great list of "18 Things You Can Get Rid of Today." I know that there are a lot more things I need to get rid of in the list. 

Source: rayandjen.com

This is one of the best tips I've seen this year: turning your hangers around at the beginning of the year to help weed out your closet. Ray and Jen tell you all about it.

Source: craftster.org
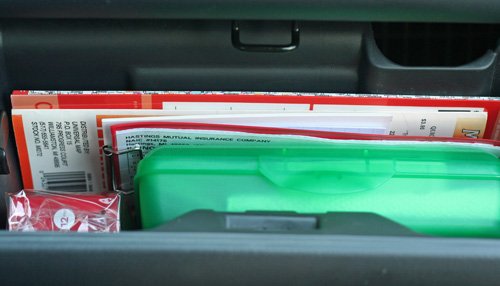
Total, "Why didn't I think of that?!" moment!


Simplify 101 has great tips on how to organize your glove box in 15 minutes.

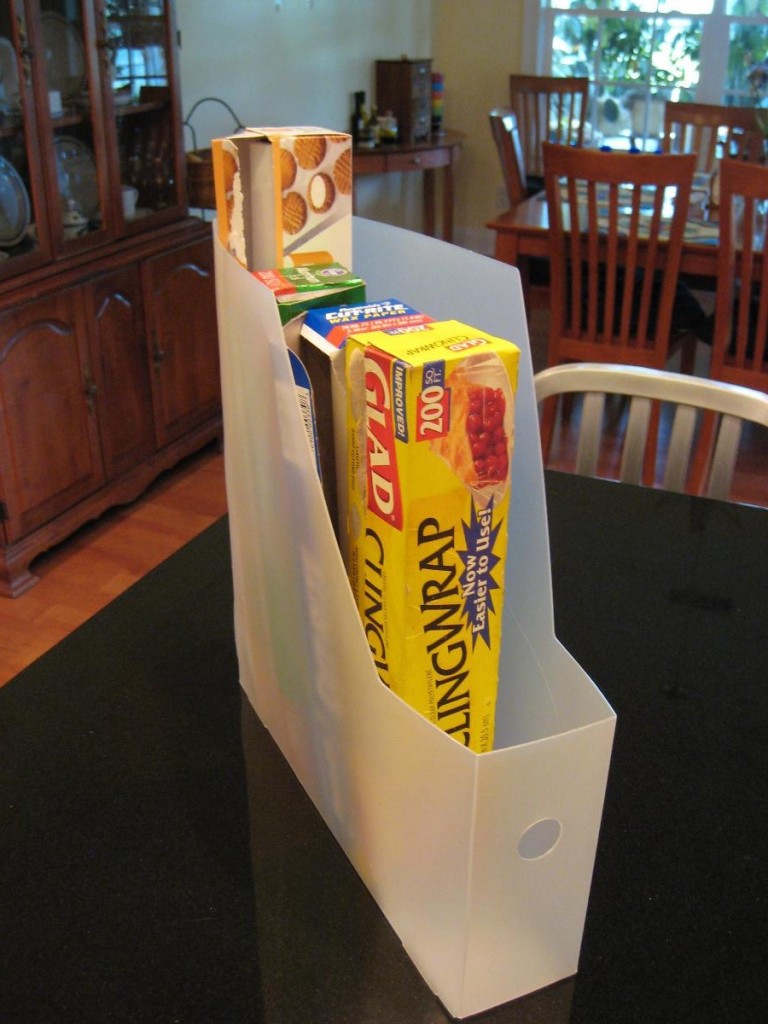
                  Source: chicaandjo.com
As soon as I found this, I went right to my pantry and put all of the different wraps into magazine boxes I had from Ikea. It's amazing how much it helps keep them more organized if you don't have a drawer for them.

The craft room should be done in a day or so and then I will get everything posted on that. I can't wait to show you all everything I've done!

I'll be linking up to my favorite parties.

Pin It

Monday, February 20, 2012

Much Needed Workout Motivation

There's a much younger and skinnier me stuck with a magnet to the fridge. It's supposed to remind me of the weight loss goals I have set for myself. Sadly, I've reached a bit of a plateau and lost some motivation. The biggest problem - I LOVE FOOD!!! Diets are no fun because they are so routine and usually have weird food that I have no interest in eating. Or you have to take some sort of diet bar, shake or pill and that never seems to work out well. The weight just comes back when you stop eating/ taking them.

So with Lent starting this Wednesday, I realized it was the perfect time to set some new goals. First, being healthier with eating choices - not eating out and instead cooking at home. That in itself should help a lot. Second, it has become very apparent that I must start working out, as much as I have tried to avoid it.

I've been browsing Pinterest for some ideas to help motivate me to get going with a workout routine. That place is always full of great things and this time was no exception!

Rock My Run is one of my very favorite Pinterest finds! They upload new running playlists every week. Everything is upbeat and great for working out. Now if I could just use them for working out instead of singing in the shower!
Source: rockmyrun.com via Andi on Pinterest


I love this visual reminder of weight loss. Vases and marbles are definitely going on the shopping list!


Not just to tell people, but to know that I am not anymore.

Source: google.com via Andi on Pinterest

I love this because I look like a hot mess after I workout!


Can I get as an audio track every few minutes on my playlist?


Absolutely REASON #1!  I have to remind myself that, "Endorphins make you happy!" to quote Elle Woods.


What are some of your tips or motivation for helping lose weight?

I'll be linking up at my favorite parties this week!

Pin It

Monday, February 13, 2012

So Pinteresting #3: Lovely Quotes

With Valentine's Day just around the corner, my Pinterest finds this week are of course inspired by love! There are so many famous love quotes and poems out there that are wonderful but my husband and I tend to be a bit quirky. There are some more traditional quotes in here and then I threw in some more unique ones for those that are like us. Enjoy!

Source: google.com via Andi on Pinterest


Source: etsy.com via Andi on Pinterest


Pin It

Tuesday, January 24, 2012

So Pinteresting! #1 Baby Things

Anyone that follows me on Pinterest knows that I pin baby stuff like crazy. Anyone who doesn't know me probably thinks I'm having a baby soon or planning to have one in the near future. Well I'm not, but it seems that everyone I know is!

So I have been pin crazy with ideas for great things that they need. We've been surrounded by little boys in my family for over 10 years now, so I'm very excited to have a girl coming our way soon. All I see lately are pink, ruffles and rhinestones! Girly, girly, girly! I mean it's really about time!

With all the pink on the brain, these are some of the things I've been seen pinning:


Source: etsy.com via Andi on Pinterest

Source:teagreenchandelier.com on Pinterest via user andimac14

Source: The Mama Dramalogues - Make It: Gorgeous Shadowboxes

Now to just get started making the new little one things before she gets here!
Pin It

Monday, January 16, 2012

The *Easy* Baby Blanket


My father-in-law was looking for a gift for a co-worker who had just had a baby. I wanted to make something functional and pretty but I was also short on time since I had forgotten that I had promised to make the gift. While surfing around on Pinterest (as I have been known to do), I stumbled across this delightful tutorial over at Mama Stellato.

Her pattern is just as simple as the title suggests. I was in love! Here was something that I could get done fast enough to make up for all my forgetfulness.

The front piece I used is a patterned fleece. I was able to find a cute baby themed pattern that I just loved. I found a matching piece of brown flannel for the back panel. Since the fleece is so thick and cozy, I didn't use the batting as the pattern suggested. Putting the fleece and flannel together made for a super soft and cuddly blanket. Other than that, I followed the steps outlined in the tutorial.

These are so fast to sew up that they are now part of my regular routine for my Project Linus blankets. Saves a lot of time, since I always seem to be working on a million different things.

So the next time you have procrastinated a baby gift, keep this in mind!

Saturday, December 3, 2011

One for the guys (and girls too)...The Dresser Remodel

This project came to be because I have always loved Craftsman tool boxes but that's really not in the budget right now. And diamond plate! Oh how I love diamond plate! At one point I really wanted a kitchen with a diamond plate back splash. The inspiration for this project was this ratty old dresser that I used to store fabric in. I have much better storage for the fabric now, so I have no need for the dresser. On Pinterest, I had read some tutorials about repainting laminate without needing to sand (which I've heard can be a nightmare). This one from Karla's Cottage was especially helpful.

So I give you - The Dresser Remodel:


 1. I started with the ratty old dresser. Some of the laminate was peeling and it was just ugly. I prepped it by wiping it with a damp cloth and letting it dry. Then removed all the handles. The places where the laminate was hanging off, I carefully removed but didn't peel too far off.


2. The next step was to remove the drawers and paint two coats of Glidden Gripper Primer. The dry time for the coats is very short, only 30 minutes or an hour in between coats. It thoroughly covered everything. I only bought the quart size can of it and it was more than enough for the dresser and the drawers.


3. I used Benjamin Moore Color Samples in Red and Black. I had a coupon for two free cans, so that didn't end up costing anything. Two coats of black went on the drawers and two coats of red for the main piece. Then  sprayed a clear coat of Krylon on the entire thing. 


4. The finishing touch was new chrome handles and putting it back together. Total cost - less than $25 (some supplies I was able to get free and some I had on hand). Overall much cheaper than a new upright tool chest!

Thursday, October 20, 2011

Have You Started Christmas Shopping?

Confession: I'm almost done! It's the first time I've ever been this close to being done with Christmas shopping this early in the year, but I still have a lot of work to do on stockings. We have a lot of people at our big family Christmas, so there are a lot of bases to cover when it comes to stuffing stockings. In my playing around on Pinterest, I came across an awesome blog and I had to check it out.


This has to be one of the best lists of stocking stuffers I have seen so far! Plus for those that don't like to make everything on their Christmas list, it's not all crafty things. Jenna's Journey gives a complete list of items for everyone on your shopping list and they are really creative things too. It's going to make my shopping so much easier. I may even be done before the month is over!


Wednesday, October 19, 2011

The Dirty, Dirty Couch

I knew my couch was dirty before I started this project, but I really had no idea how dirty. I have loathed it lately and had started shopping for slipcovers. Well back-up. First, I started looking for tutorials on how to make slipcovers. That looked like an absolute nightmare, really, I think you must be very brave or absolutely crazy to make them yourself. So then I started shopping around. The prices were killing me! I couldn't imagine spending what some of the places were asking and I wasn't even finding anything I was the least bit in love with. It just so happened on the same day, I found two AMAZING things to share with you.

First, for those in the market for a slipcover, check out www.uglysofa.com. They have beautiful and affordable slipcovers. They carry brand name slipcovers at unbeatable prices. Believe me, I've looked at the other places. And I was not paid to say this, just found them and saw how awesome they were.

The second thing I came across was on Pinterest. I found a tutorial on how to clean a microfiber couch. (Update 8/13/15: the link to the original tutorial is gone.) It was really my lucky day because that's exactly the type of couch I have. So I figured I would give the cleaning a shot and if that didn't work, I could always buy one of the great slipcovers I found.

I made a list of all the supplies I would need and headed out to Walmart to get them. I couldn't find white scrubby sponges like she recommended but I found brown, which match our couch so I grabbed them. I had no trouble with the rest of the supplies.

Supplies needed:
A spray bottle, rubbing alcohol, soft scrubbing brush like pictured, scrubbing sponges (ideally white to prevent color transfer).

Pour the rubbing alcohol into the spray bottle and spray the affected area of the couch. Use the scrubbing side of the sponge to scrub the dirt off of the couch. Then use the soft bristled brush to rub the nap of the fabric back up after it has started to dry. It will help restore the original softness of the fabric. Try not to over saturate the fabric because it can leave "water ring" like spots and only clean in small sections at a time.


I didn't notice until I posted it but I had a nice glass of wine in my supplies picture. It wasn't mentioned in the supply list but it is a nice thing to have if your couch is as dirty as mine.  You are going to be doing a lot of scrubbing and you will sure need it for your breaks. Warning though, open a window or two if you can, the smell of rubbing alcohol is VERY strong!

So this is my dirty, ugly couch cushion before:
 

And this is my lovely, almost perfect couch cushion now:


I think I can live with it awhile longer.

Monday, October 3, 2011

Family Name Art

Yesterday was my Grom's birthday, that would be grandma to most of you. We are taking her out tonight to celebrate and I wanted to make her something very special. Her house has been in the process of being remodeled and I found this wonderful frame at Ikea when we were on a trip there for decorating inspiration. It's fun having two places to redecorate. Pictures of our new place will be coming soon! I've been so busy with packing and moving, then unpacking and organizing that I almost forgot about making her present. But yesterday, my mother was posting pictures for everyone of all the happenings over at their place and a light bulb went off - Grom's present! So, I put everything else aside and got to work figuring out what to do for her and came up with this:


I wanted to make sure that it would match their new decor and that it wouldn't just be another piece of art to hang on the wall. I used the pictures that my mother had posted as color inspiration, especially this wall hanging she made:

(don't you just love it?)
  
The details: The background on the right and left sides are newsprint scrapbook paper and the middle is a green print from the Luxury Stack of Premium Stack scrapbook paper. On the left I attached a white cardstock daisy and on the right I used a white scroll font stickers to spell "Fish," the family name. I printed the quote on the green paper in LD Old Glory font. "Being a family means you are part of something very wonderful. It means you will love and be loved for the rest of your life. No matter what."

I think it will go wonderfully with the new decor and more importantly, I think my Grom will love it!

Monday, September 19, 2011

The *Easy* Empire Waist Dress

This started out to be something completely different.


I had this cute t-shirt that I wanted to make into a dress and I found a pattern that I thought would be simple enough. Well, I was totally wrong. I was so horrified by the outcome of the dress that I couldn't even take a picture of the ugly mess I had created. It was just hideous! I put the whole thing into a drawer with my other fabric to deal with later. So a few days later I tried to salvage the mess of a dress by adding a ruffle to the bottom. It just made it worse. I really should have taken pictures of this mess but it was so embarrassing. Not wanting to waste this cute shirt, I got out my rotary cutter and sliced it off the top of the mess of a dress and threw the rest away. I never wanted to look at it again. I still loved the shirt though so I was on the hunt for something to do with it. Browsing my favorite place Pinterest, I came across this darling dress from Smashed Peas and Carrots.

I LOVE this dress! The pattern is simple enough and she shows all the steps for making it. It really was an easy dress to make. In her pictures, she shows it as a maternity dress, but she comments that it would work as a regular dress as well and she even makes a child size one following the same pattern. My thoughts on making a maternity dress - I would definitely use a jersey or stretch fabric because it would allow for so much more comfort and room to grow with you. The only difficulty I had came when attaching the shirt to the skirt. I think my shirt wasn't quite as fitted at the tank top she used. If I were to do it again, I would run a gathering stitch around the bottom of the shirt and pull it until it matched the size of the skirt, then pin them together. I think it would make it much easier to attach them doing that. I used a knit t-shirt as the top, 1 & 1/2 inch elastic for the waistband because the store was out of the 2 inch and then a patterned cotton for the skirt. Following her measurements worked really well for me to make my dress.

I was worried after all the trouble I had with the first dress that something would be wrong with this one but I have washed and worn it and it has held up. It is a great dress and super comfortable too! I imagine that it would make a great maternity dress for all the mamas out there. It sews up really quickly and truly is an *easy* dress!

Friday, September 9, 2011

Learning to Make a Shirt

I love Anthropologie! Like seriously L-O-V-E! I always find the most amazing things there but I always run into a few problems. #1 My budget doesn't have room for me to buy all the great things I see. #2 About half the time, the things I find and fall in love with are out of stock. Which leads us to the story of my new shirt(s). I found this shirt, which Anthropologie no longer carries, but I have been in love with.

It looked like it would be simple enough to make - just a front, a back and a sash. Boy was I wrong! I really wish I had taken a picture of the mess of a shirt I made the first go-round. It was hideous! That's when I realized that while I can sew, I really do need some sort of direction... maybe... just a little.

Lucky for me I found Sweet Verbena on Pinterest. She has a tutorial that looks almost identical to my dream shirt! I love her!!! So the first item on my agenda was to make a shirt following this tutorial.


I used a white jersey with faint yellow apples for the body of the shirt and then a yellow cotton for the sash. I had not sewn much on jersey before and making this shirt was a breeze. I had my doubts when she said it would be easy, but it was! It really turned out like a dream!

Now I was ready to tackle my mess of a shirt from my first project. I had sewn it on 100% cotton (the pink on the left). I basically ended up ripping apart the first project and sewing it back together following her tutorial. I was actually able to save what I thought was destined for the scrap pile. 

I now have 2 new shirts. They sewed up super fast too, which was one of my favorite parts. I always love a quick and easy project!

So if you are just starting out or dusting off your machine after it's been sitting for awhile, I highly recommend this project. It's fun, easy and you'll end up with a really cute and flattering top!

Crazy with Crayons

If you have been on Pinterest, you have probably seen a lot of art similar to this. I am pretty sure every person on there has pinned it.

These are plain artist's canvases, I didn't buy anything fancy - whatever was on sale at Michael's. With this one, I used three 24 packs of crayons minus the black, white, brown and gray. I arranged them by color to make sure they would fit on the canvas and lined them up like the rainbow. Then I used my glue gun to glue them all onto the canvas. Next, I covered a huge area with newspaper - very important! I borrowed my mom's heat gun (similar to a blow dryer but it gets much hotter and has a more concentrated flow of air) and very slowly started melting the crayons. I found the best method was to hold it at a 45 degree angle above the canvas to better direct the flow of the wax and eliminate the overspray. I would stop periodically and let the wax re-harden and then start again to get different patterns.


On this canvas, I used a straight razor to remove the paper from all of the crayons and assorted them in a random pattern with some spaces in between. I wanted a more abstract look with this one. I followed basically the same steps as above but had to be more careful about melting the crayons themselves too much because there was no paper to protect them. I noticed that if I held the heat gun on them for too long, they would start to warp and I wanted them to maintain the look of a crayon.


After making these two, I went to the back to school sales and stocked up on crayons because I have so many ideas of how to do different pictures and patterns with them.

Welcome!

Welcome to my new blog. I'm Andi and I am going to be sharing with you all the crafting I do, plus some of the other things that may spark my interest. I am just learning how to make tutorials, so bear with me on that. My favorite thing to do is find something that inspires me and recreate it to show you that it's possible to do it yourself. Sometimes I will be inspired by just a picture and will hunt down a tutorial of something similar so that I have guidelines to follow or sometimes the project is simple enough that it doesn't need much direction. Either way that is my main crafting love.

I follow a lot of blogs and I LOVE Pinterest for inspiration. If you haven't been on there yet, you definitely need to go. Go now! It is amazing! Let me know if you need an invite. I'm definitely an addict and can spend hours on there without even realizing it.  But the good thing is that it truly is an inspiration board for me. I have made a lot of crafts from there and I will share everything I can with you.