Over at C.R.A.F.T., Jamie hosted another great Package Pals exchange. This time around I got paired with Ami from AliLily. She is so fun and we have become great friends. Stop by her blog because she has great recipes, craft tutorials and you will LOVE the jewelry she makes!
Participating in Package Pals is a blast because not only do you get to make something crafty for someone else, but you get the surprise of an awesome package in the mail.
After getting to know Ami, I found out her favorite color was orange so I went with a totally orange themed package.
We've been awaiting her arrival for quite some time and she kept us waiting an extra week, but Zoey Jane is finally here! She arrived this morning and is beautiful. I have so much more to post about her and many other things to share with you all but just wanted to give everyone a quick update about her.
I'm sure we will have much better pictures soon but I just had to share!
It's that time of year when many of you are starting to work on your spring cleaning lists. I recently took an unscientific poll of my friends to gather up some of their most dreaded chores around the house. Boy did they have some tough ones! Lucky for you and for them, I've rounded up all the solutions here in one place.
My sister is well known for her beautiful diaper cakes, so I knew that I had to make one for her shower. The only problem was that I had never made a diaper cake before! It was going to be a big challenge. My mother and I came up with the idea of making a diaper cake and matching washcloth cupcakes.
As a base, I used a dollar store platter, then taped a paper towel roll standing up in the center to have something sturdy to build the cake around. The shower theme was pink and black so I wrapped each layer of diapers with coordinating fabric to hide the white and yellow diapers.
It's been such a busy past few weeks! We had my sister's first baby shower, followed by my mother-in-law's birthday party, then the second baby shower. I've spent a lot of time over at my sister's house helping her sort through all the baby goodies and get them organized and put away. So much to do before a baby gets here! I really had no idea! I will get more posts up about all those fun happenings soon.
I actually had a bit of time to do a project around my house, which was a nice break from all the running around.
Confession - I had my Valentine's Day wreath up until about mid-March and realized that I should put up my St. Patrick's Day wreath. The only reason it got taken down is because we had a huge wind storm and the bells on the wreath were driving me crazy banging against the door. I decided this time instead of making an Easter wreath that may end up getting left up until Fourth of July, I would make a nice spring wreath.
We recently threw my mother-in-law a big 50th birthday party. My sister-in-law enlisted my help to do the party decorations. That's part of where I have been lately, among the many other projects going on.
My mother-in-law was expecting a big over-the-hill party. Instead we decided to surprise her with a classier theme. Her favorite color is purple, so we settled on a purple and black themed party. We spent a lot of time browsing party decor online and didn't really like the stuff we were seeing in the stores. When we searched for party supplies for adults, we just couldn't find anything that fit our party plan. Most of it was for over-the-hill parties or just too tacky.
Spring is in the air around here and everyone I know is having babies. I have been a busy bee making all sorts of things for little ones. I think baby gifts are one of my most favorite gifts to make because they are so cute!
A couple of our best friends just recently had their first boy and I wanted to make them something bright and fun for him. I remembered The *Easy* Baby Blanket I had made awhile back and thought that something like it could be the perfect gift, so it was off to the craft room once again.
This time I decided to jazz it up a bit and make a 4 patch blanket. It is just as easy as the original and sews up so quickly!
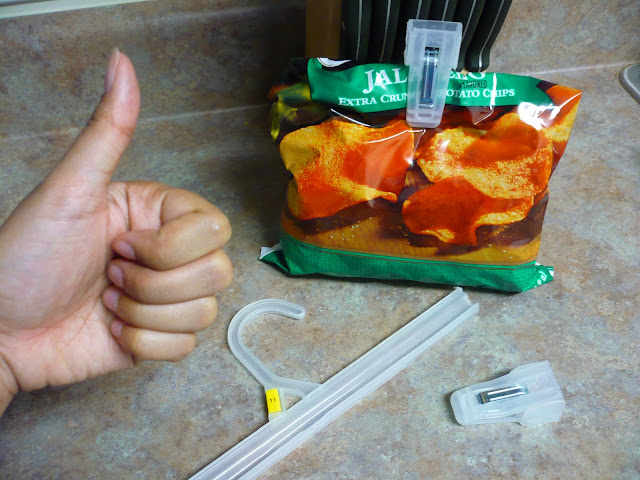
For awhile now I have been very frustrated with the look of my car's headlights. Not to mention the fact that it makes it very difficult to see at night. They were completely yellow and fogged over. I was about at the point where I thought I needed new ones.
I can't take all the credit or in fact any of the credit on finding this incredible trick. My good friend Carol posted on Facebook about this neat trick and as soon as I read it, I went running to the garage to give it a try. I figured that it couldn't make them any worse and I had everything on hand.
Supplies Needed:
Clean rag or two
Toothpaste (the original post recommended Colgate but I used what I had on hand)
Not pictured - bowl of water
As seems to be the case with almost everyone around me, I've been down with a cold most of this week. Boo! So that explains the lack of posts. But in my down time, I've been browsing all sorts of other pages.
I'm totally loving all the St. Patrick's Day inspiration I'm finding. If I can manage to kick this cold, I may manage to get Valentine's Day stuff put away in time to get up some St. Patty's stuff.
I would love to bust out my new Silhouette interfacing and give this lucky pillow from Infarrantly Creative a try. It's just so festive and would be a great replacement for some of the other Valentine's decor!
After getting all the buttons sorted in my craft room, the Shamrock Button Art from Oopsey Daisy would be a fantastic way to put them to use.
I am totally in love with the St. Patrick's Day Banner from Simple as That. It's so beautiful that I may have trouble taking it down after the holiday.
My sister-in-law just mentioned the other day that there are no cute shirts for St. Patrick's Day this year. I think this ruffly tshirt from Thirty Handmade Days proves her wrong and I think I may end up making it for her. It's just too cute!
Gluesticks has totally awesome St. Patty's Day party ideas for kids. This rainbow looks so delicious!
And over at Let's Go Fly a Kite, they are making some reallyfun leprechauns. Now I know what I've been saving all those toilet paper and paper towel rolls for!
A big thanks to all of these blogs for the amazing inspiration! Be sure to stop by and tell them hi.
At the end of January, a bunch of us signed up for C.R.A.F.T's Package Pal's Party. It's a fun way to make a new friend and exchange really awesome (crafty) goodies with them.
My package pal is Tres over at Tres Chic Nails. She also runs another great blog - The Inked Hooker. I was super excited when I found out that we were matched up because she can crochet! As I may have mentioned, I am totally incapable. She was super excited too because I can sew. We couldn't have been matched more perfectly! Her package to me is in transit and should arrive any day.
Since she is an avid crocheter, I knew just what to make her. I came across this lovely little Crochet Hook Clutch over at Little Birdie Secrets. They give a great tutorial on how to make it, but it does take some patience.
Tres mentioned that her favorite colors were red and black and while I was hitting up one of the local quilting stores, I fell in love with the gorgeous fabric
I picked a contrasting inside fabric for the hook pockets and made a small pocket for her needles. I used the measurements in the tutorial as guidelines for where to sew the hook pockets. I also sewed a bigger pocket that could be used for small scissors or a wider hook.
The whole package included the hook clutch, a hook sizing ruler and a cute California postcard.
I heard back from Tres recently and she just loves it, which makes me soooo happy!
If you get the chance to do the Package Pals, you definitely should. It's a ton of fun!
I will also be linking up at these parties this week.
The craft room makeover is finally finished! Whew! It's been quite a month and I'm so happy with the way it has turned out. You may remember that I decided to organize my craft room/office since it was one of my projects to
complete on my 30 Before 30 list. This room was in major need of a
renovation as you can see from the before pictures. Since this room is both the craft room and the office it needs to be a very functional space.
My nephew's girlfriend Jennie came over and made an amazing video of the completed room for me. She is so talented and I love the video she made of the room. I felt that pictures alone couldn't give the full affect of the transformation that took place in here, so here is the completed room tour:
I took this project on as part of the 29 Day Organizational Challenge at I'm an Organizing Junkie. It's funny because I had been living with the chaos of the room for so long I had sort of gotten used to it. But once I decided to start organizing, I really got going and couldn't stand it anymore.
The steps I took to get started: I made lists of things to work on and projects that needed to be completed. I like making lists because it keeps me goal oriented and I can see the progress as I check things off. Then seeing the before pictures and looking at the progress I was making really kept me motivated. I also had my sister come over and help me. We did an entire day of cleaning and organizing. It was great having her here because it kept me from getting distracted by all the little things.
The hardest part of the challenge was deciding what was really worth keeping. Of course I felt like I loved everything in here as I came across it or had the thought that it could be useful. I kept having to remind myself that if I hadn't used it recently that I probably wasn't going to anytime soon. Once I saw how much space I was creating, I started feeling better about the purge.
One of my biggest purges was fabric. Luckily my sister-in-law Cassidee is planning a project for her Gold Award in Girl Scouts that will need a lot of fabric, so I sorted through and pulled out everything I thought she could use. I also had a huge drawer of scraps and another bag under my desk. I went through all of that and narrowed it down to a small drawer of useable scraps. I also purged a lot of the decor in here. Most of that ended up going to my sister because it just happens to match her house. I really wanted to try and have the place not look like it was the room of "leftovers." The rest of the stuff I purged went into a pile to donate to Goodwill.
The best part of the whole challenge came just a few days ago when my husband was doing some work from home and I was working on some sewing. We were both in here, spread out in our areas and not in each others way at all. The most amazing thing was that there was still plenty of room to walk around too! The room is completely functional for us now and that was the main thing I set out to accomplish.
One of the best finds in organizing the room was the 4-tier shelf I got from Lowe's. It was only $15! It fit perfectly in the closet and allowed for so much more storage space. I used a bunch of dollar store shoe boxes to organize my craft odds and ends. My sister Aspen came up with the idea for the cute labels that we put on them. I made them all with my Silhouette and the designs all came from their online store. I also got a new file box for my coupons. The old one had a broken lid so it wasn't very functional. All the couponing stuff is on one shelf and should stay nice and organized. I also know exactly what is in each box now, which makes it so much easier to find everything.
Another great find was the Closetmaid rack I used for the ribbon and paint on my wall. It's original purpose is for canned goods in the pantry but it's the perfect size for all my ribbon. I don't have to search through totes and boxes to find everything anymore. And as luck would have it, I had a bunch of mason jars that my mother-in-law gave me for Christmas and found that they were the perfect thing to sort all the buttons and embellishments into. My buttons are all sorted by color now which is so awesome!
The boxes on the shelf that hold my Silhouette and scrapbooking supplies came from Ikea and really help contain everything so that I can find it. Before they were all mixed together in a big under-bed box. Everything would get lost in the big box and I never really knew what was in there. I found out that I had 3 boxes of photo corners. The funny thing is that I can't even remember the last time I used photo corners. The pots under the shelf that hold my scissors and paintbrushes also came from Ikea. I seriously love that store! They need to build one by me so I don't always have to drive to LA every time I think of something great I need. I found it so helpful to have the painting stuff accessible the other day when I went to paint something and I could see all the brushes I have as opposed to the mess of Ziploc bags they were in before.
The best thing I did in the room was rearranging the furniture. I don't know why I didn't think of it sooner but it is so much nicer in here. With the new layout, there is an "office side" of the room and a "craft side" of the room. Everything I need is in it's own area and very organized on top of that.
Overall the biggest thing I've learned from this is not to buy more craft supplies than I need for the project I'm working on. I have so much stuff - mostly fabric - that I bought just because it was on sale. Most of it will probably never get used and ended up going in a donate pile. If I can keep that in mind in the future, I know that it will be a lot easier to maintain this room.
The greatest piece of advice I can give you in tackling an organizing
project of your own is that you NEED to get rid of things. If you
haven't used something recently, it needs to go. If it's not functional,
it must go. If it's not your style, let it go. The thing is that if you
decide a year from now you want it again, there will probably be
something better available. It's not worth the clutter to hang on to
things because it might be useful.
While I've been working on finishing the craft room makeover, I've come across A LOT of great organizing ideas over on Pinterest. I thought that rather than keep them all to myself, I should spread the love and share some of them with you.
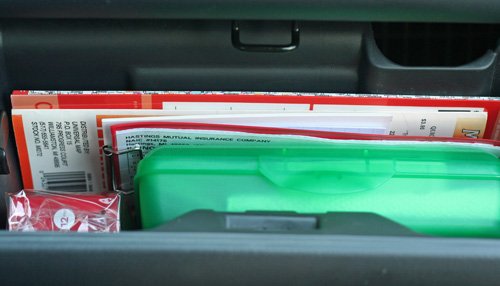
This is one of the best tips I've seen this year: turning your hangers
around at the beginning of the year to help weed out your closet. Ray and Jen tell you all about it.
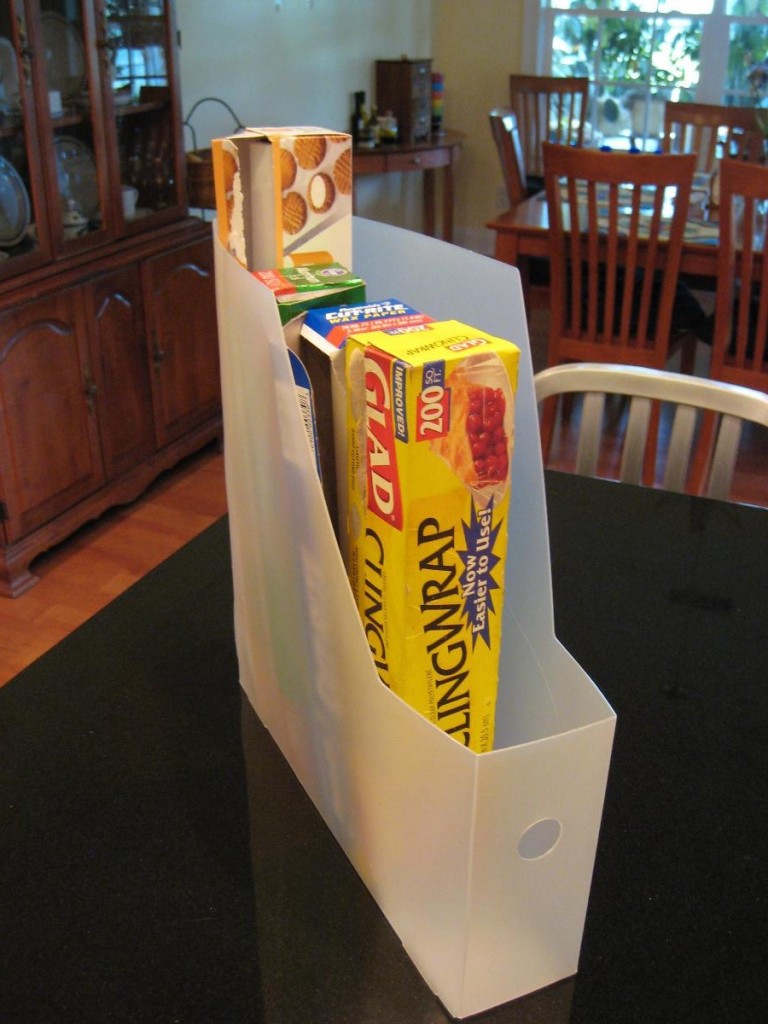
As soon as I found this, I went right to my pantry and put all
of the different wraps into magazine boxes I had from Ikea. It's amazing how much it
helps keep them more organized if you don't have a drawer for them.
The craft room should be done in a day or so and then I will get everything posted on that. I can't wait to show you all everything I've done!
After spending a couple hours out shopping with my one year old nephew, I realized that babies go through a TON of socks! He would go into the store with two socks and inevitably by the time we left there would be one lonely sock on his foot.
I realized that the perfect gift for his first birthday would be some baby socks. I mean the more he has the better, right?! Especially since he seems to be constantly losing them.
I didn't want to just throw a bunch of socks in the bag and call it good either because that just didn't seem fun. So I came up with the "Cozy Caterpillar" baby socks gift. It's super cute and easy to make!
Ingredients: About a dozen baby socks (boy or girl) 1 pipe cleaner 2 mini pop-poms 2 buttons Green shredded paper Note: I have double stick tape pictured but I found that Elmer's glue dots
worked better for part of it, so I ended up using both Not pictured: Container to put it in (I used a cookie tin)
Step 1: Take one of the baby socks and roll it up as seen in the picture.
Step 2: Take the first baby sock and put it down inside the foot of the matching sock.
Step 3: Starting at the opening of the sock, roll it around the foot so that you end up making a ball.
Step 4: Do this with all the remaining socks. Then decide which pattern
you would like your caterpillar to have. There was only one red sock
with mine, so I made that the head.
Step 5: Cut 2 pieces of pipe cleaner, each about 3 inches long. Wrap the
bottoms together to form a "V." Bend the base of the "V" and attach it
to the top of the head with the glue dots. Using the glue dots again,
attach the pom-poms to the tops of the pipe cleaners and then attach the
eyes. You can see why I changed it and went with the glue dots instead.
The tape just looks messy!
Step 6: Place a piece of double stick tape on the bottom of each sock and attach them to your container. The double stick tape worked perfectly for this. I made a zig-zag pattern with the socks. First, to get them all to fit and second because I thought it was cute and wiggly.
Step 7: Finish by filling in around your caterpillar with your paper shreds. I made mine by running 2 different colors of green paper through my shredder.
There you have it! A cute and fun way to give baby socks!


_thumb%5B4%5D.jpg?imgmax=800)